Development Process: Ideation and Prototyping
What Lies Underneath is a small narrative game built using the Bitsy game maker (created by Adam Le Doux), an open source tool designed to be simple enough for just about anyone to make their own games.
I’m sure I would have sat on the idea and pondered it for a much longer time, if not for the Greenlight Jam. The jam is designed to have participants work through each stage of the game development process — from ideation to prototyping, production, and release of the final product.
Thus far, I’ve worked through the first two stages, ideation and prototyping, for the game, which I’ll share a little about here.
Ideation Sprint
Research — One of the first things I did upon deciding to make a Bitsy game was to play a ton of Bitsy games to see what creative ways other designers have used the system — and what I might be able to pull off myself. I was duly impressed with the amount of wonderfully innovative stories that folks have told using the system.
I’ve created a list of the many Bitsy games that I particularly loved, and here are a few that I found inspiring when coming up with my own concept:
- Seven Things I Mistake for My Cat by anna anthropy – Hiding areas of the map from the player to create a sense of mystery.
- rain by Sean – The use of repetition to tell a compelling story.
- Diplomat Simulator by WJHolly – The use of repetition and changing background elements to support the narrative experience.
- Mistakes by thisisstar – Cutting to close-up images to evoke a particular moment or feeling.
Choosing the Concept — Going into the jam, two concepts immediately came into mind.
-
A woman wanders into the woods and meets fairies. Not the nice kind of fairies, mind you. The wicked and dangerous kind of fairies.
-
A woman returns to her family home after her sister’s death. Once there, she begins seeing the ghost of her sister and finds herself stalked by a monster at night.
After conducting my research into the vast variety of Bitsy games, I gained a better sense of how I might tell each of these stories — and as a result, which of the stories I wanted to tell.
The final decision, therefore, was to go with concept No. 2.
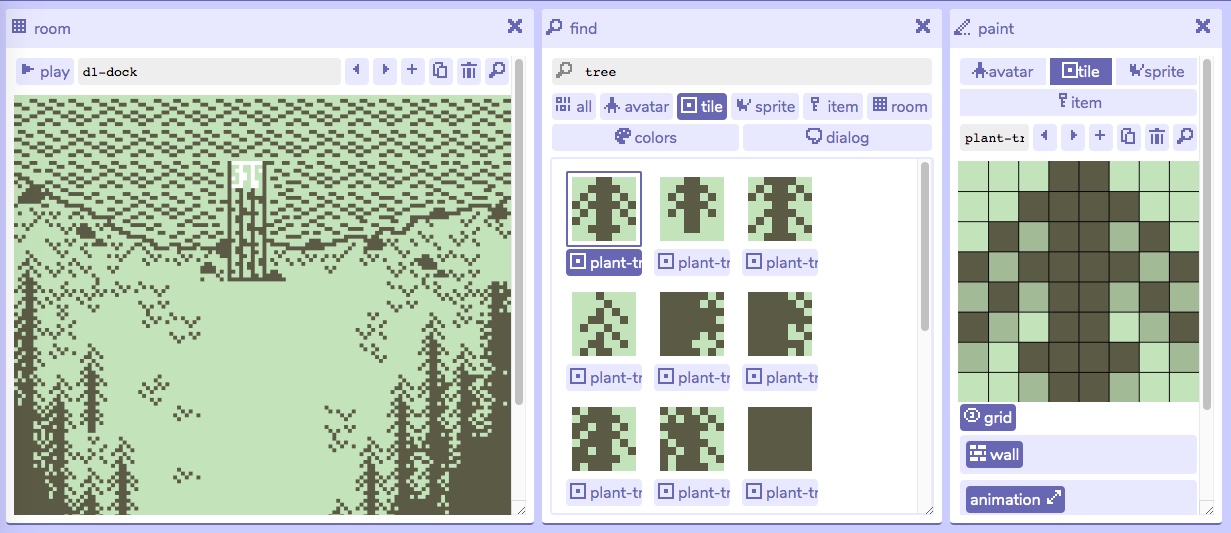
Building a Functionalities Prototype — The final and possibly most important step of the ideation process was to develop a functionalities prototype (available at the end of this post). Essentially, I dove straight into the Bitsy game maker and worked with the tool to see what I could pull off with it. This included creating several rooms, hiding areas on the map, making entrances and exits between rooms, developing variables in the form of locked doors, and so on.
Creating the functionalities prototype helped me quickly understand how long it would take to implement various aspects of the game — and as a result helped me determine its scope.
In this case, I realized that trying to include the monster with the storyline (as I currently planned) would have doubled how long it would take to make the game. So, I removed that aspect from the story concept.
Prototyping Sprint
The second stage of the Greenlight Jam involved developing a prototype for the game that would highlight the gameplay, art, and/or other elements of the game. This can be accomplished a number of ways, but I decided to go with creating a vertical slice of the game — essentially the first level (or “day” might be more accurate, as it occurs in this game).
-
Drafted the text for the first level of the game, introducing the characters and world and setting up the heart of the storyline.
-
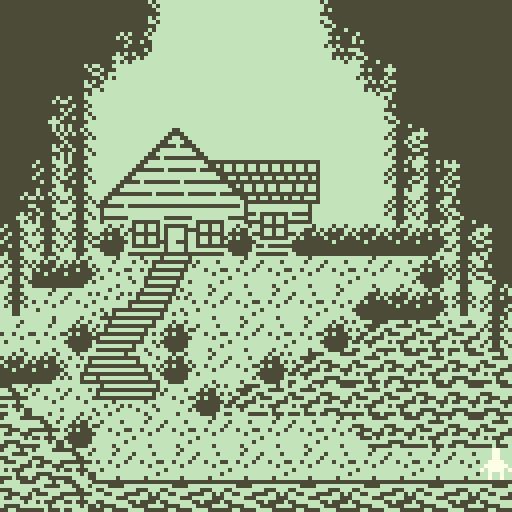
Created the art and main areas of the game using Bitsy maker. This was a delightful aspect of the development process, as I got to learn how to make a new kind of art.
I’ve been sketching and making art since I was a kid, but pixel art was new to me. Before starting in, I went back to the Bitsy games I played before and examined how they achieved their various effects.
The process of creating visual elements block-by-block in a modular fashion involved a bit of trial and error, but turned out to be surprisingly intuitive for me. And I’m pretty happy with how the rooms turned out.
The final close-up visual (which I’m calling a cut scene) was created by sketching out the concept by hand and then processed it into pixel art using pixsy.
3 – Implemented the narrative and game elements into the game maker, combining all I learned into a finished, playable prototype that highlights the first section of the game. The vertical slice prototype is also available to download below.
Next Steps
With the ideation and prototyping stages of the Greenlight Jam completed, it’s on to the Production. Over the next eleven days, I’ll be drafting and implementing the final game — following by polishing and the catching of bugs prior to release.
I’m excited about this game and the creepy story it’s trying to tell. And hopefully, once it’s done, others will be excited about it, too.
Comments
Log in with itch.io to leave a comment.
Thanks so much for the shout out! Glad you liked it.
My pleasure!